

Complete Beginners Guide To React Native
Build A Live Tv Application for Android Tv


Welcome you all to a brand new series on react native in this series on Desidev's blog We will discuss technology surrounding react native.
Prerequisite
ReactJS
Javascript (ES6)
Tools
To start with react native we will need some tools like NodeJS, Android studio, Java and our favourite vs code in the tutorial to cum-guide. We will guide you to build a Live Tv Android TV application with react native.
Check the Following
node -v
npm -v
java --version
adb --version
Now Start
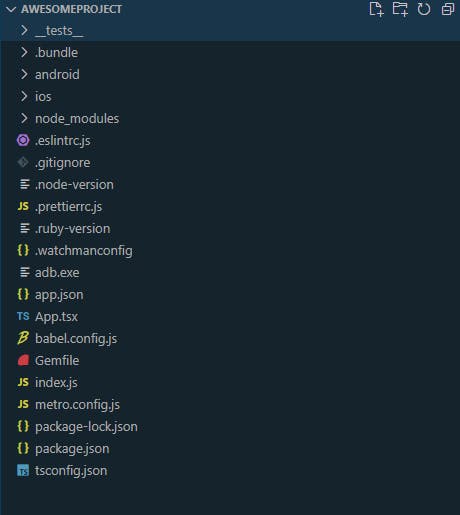
npx react-native init AwesomeProject
It will generate Brandnew React Native in AwesomeProject For you.
cd awesomeproject
And add the following packages into project:
React Navigation for Navigation and Axios for Fetching the Api's and React-native-video
npm install @react-navigation/native
npm install react-native-screens react-native-safe-area-context
npm install axios
Now go to Android Folder And look for file local.properties In the android folder. If its present then good else you need To create manually and put the following codes
sdk.dir=C\:\\Users\\{{your_username}}\\AppData\\Local\\Android\\Sdk
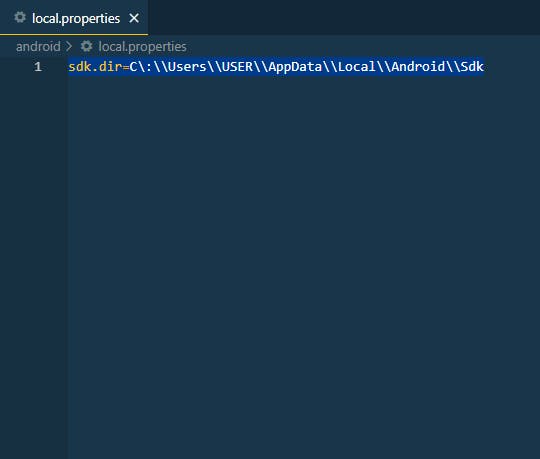
In my Case 'USER' is my username . After Adding it will look like this.
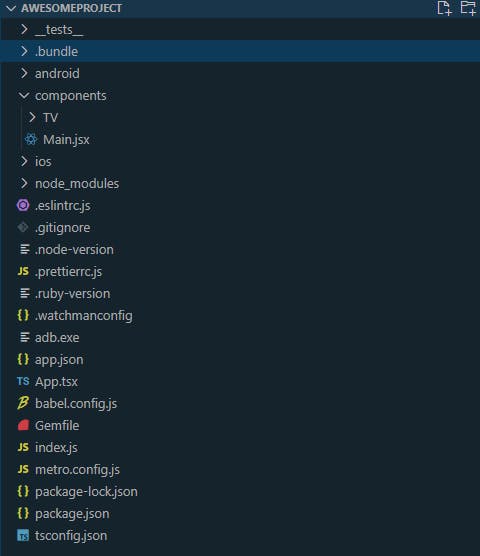
Now Create a folder with the name components folder in the root directory. Under the components Folder create TV Folder & Main.jsx File. And In TV create a Tv.jsx , Now Here You can notice by default project is initiated by TS (TypeScript) But We Can Add Our .jsx files there easily.
In TV Folder / Tv.jsx put the following code.
import {useState, Component } from 'react'
import Video from 'react-native-video';
import { View, FlatList, StyleSheet, Text, Button, TouchableOpacity,Dimensions,PixelRatio} from 'react-native';
const axios = require("axios");

const options = {
  method: 'GET',
  url: 'https://tvview.p.rapidapi.com/getAll',
  headers: {
    'X-RapidAPI-Key': 'SIGN-UP-FOR-KEY',
    'X-RapidAPI-Host': 'tvview.p.rapidapi.com'
  }
};

const { width , height} = Dimensions.get('window');
class VideoPlayer extends Component {
    constructor(props) {
      super(props);
      this.state = { paused: false, heightVideo: 360, widthVideo: 1 };
    }
    render() {
      const { path } = this.props;
      if(path ==='' || path ===' '|| path ===undefined||path ===null){
        return <Text> Select Other Quality</Text>
      }
      return (
        <TouchableOpacity
          style={styles.fullScreen}
          onPress={() => this.setState({ paused: !this.state.paused })}
        >
          <Video
            source={{ uri: path }} // Can be a URL or a local file.
            ref={(ref) => {
              this.player = ref;
            }} // Store reference
            resizeMode={"contain"}
            paused={this.state.paused}
      style={{
        aspectRatio: width/height,
        width: "100%"
      }}/>
        </TouchableOpacity>
      );
    }
  }

export const  TvView=({ route, navigation })=>{
  const { data, option} = route.params;
  return (
    <VideoPlayer path={data.quality[option.qua]}/>
  );
}
export const TvChannel=({  navigation })=>{
const [Lists, setLists] =({});
  const [option, setOption] = useState({
    qua:'low'
  });
useEffect(()=>{
axios.request(options).then(function (response) {
    setLists(response.data);
})
},[])
    return (
      <View>
        <View style={{flexDirection:'row', justifyContent:'space-between',margin:10}}>
          <Text>{option.qua} </Text>
          <Button style={{padding:15}} title={'low'} onPress={()=>{setOption(i=>{return {...i, qua:'low'}})}}></Button>
          <Button style={{padding:15}} title={'mid'} onPress={()=>{setOption(i=>{return {...i, qua:'mid'}})}}></Button>
          <Button style={{padding:15}} title={'high'} onPress={()=>{setOption(i=>{return {...i, qua:'high'}})}}></Button>
          <Button style={{padding:15}} title={'hd'} onPress={()=>{setOption(i=>{return {...i, qua:'hd'}})}}></Button>
        </View>
        <View style={{paddingBottom:130}}>
           <FlatList
          horizontal={false}
          numColumns={2}
          data={Lists}
          renderItem={({item}) =>
              <View style={{margin:2,backgroundColor:'teal',borderRadius:8, width:158, marginHorizontal:10,padding:15}} >
                 <Button title={item.name}  style={{padding:20, textAlign:'center'}} onPress={() => navigation.navigate('TvView', { data: item, option:option})}></Button>
              </View>}
          />
      </View>
      </View>
    );
}

const styles = StyleSheet.create({
  backgroundVideo: {
    flex: 1,
  },
  fullScreen: {
    position: 'absolute',
    top: 0,
    left: 0,
    bottom: 0,
    right: 0,
    backgroundColor: 'black'
  },
});
If you know about React you can easily understand what happens here.
Explanation of code.
- Importing modules
import {useState, Component } from 'react'
import Video from 'react-native-video';
import { View, FlatList, StyleSheet, Text, Button, TouchableOpacity,Dimensions,PixelRatio} from 'react-native';
const axios = require("axios");
- Creating Class Component called Video Player
class VideoPlayer extends Component {
    constructor(props) {
      super(props);
      this.state = { paused: false, heightVideo: 360, widthVideo: 1 };
    }
    render() {
      const { path } = this.props;
      if(path ==='' || path ===' '|| path ===undefined||path ===null){
        return <Text> Select Other Quality</Text>
      }
      return (
        <TouchableOpacity
          style={styles.fullScreen}
          onPress={() => this.setState({ paused: !this.state.paused })}
        >
          <Video
            source={{ uri: path }} // Can be a URL or a local file.
            ref={(ref) => {
              this.player = ref;
            }} // Store reference
            resizeMode={"contain"}
            paused={this.state.paused}
      style={{
        aspectRatio: width/height,
        width: "100%"
      }}/>
        </TouchableOpacity>
      );
    }
  }
Then We are Creating Two Components and exporting it TvView and TvChannel. In TvChannel Taking help of RapidApi TvView (you can get RapidAPI by signing up there) to get our Channel details. We are Storing our responses in List State
const options = {
  method: 'GET',
  url: 'https://tvview.p.rapidapi.com/getAll',
  headers: {
    'X-RapidAPI-Key': 'SIGN-UP-FOR-KEY',
    'X-RapidAPI-Host': 'tvview.p.rapidapi.com'
  }
};

export const  TvView=({ route, navigation })=>{
  const { data, option} = route.params;
  return (
    <VideoPlayer path={data.quality[option.qua]}/>
  );
}
export const TvChannel=({  navigation })=>{
const [Lists, setLists] =([]);
  const [option, setOption] = useState({
    qua:'low'
  });
useEffect(()=>{
axios.request(options).then(function (response) {
    setLists(response.data);
})
},[])
    return (
      <View>
        <View style={{flexDirection:'row', justifyContent:'space-between',margin:10}}>
          <Text>{option.qua} </Text>
          <Button style={{padding:15}} title={'low'} onPress={()=>{setOption(i=>{return {...i, qua:'low'}})}}></Button>
          <Button style={{padding:15}} title={'mid'} onPress={()=>{setOption(i=>{return {...i, qua:'mid'}})}}></Button>
          <Button style={{padding:15}} title={'high'} onPress={()=>{setOption(i=>{return {...i, qua:'high'}})}}></Button>
          <Button style={{padding:15}} title={'hd'} onPress={()=>{setOption(i=>{return {...i, qua:'hd'}})}}></Button>
        </View>
        <View>
           <FlatList
          horizontal={false}
          numColumns={2}
          data={Lists}
          renderItem={({item}) =>
              <View style={{margin:2,backgroundColor:'teal',borderRadius:8, width:158, marginHorizontal:10,padding:15}} >
                 <Button title={item.name}  style={{padding:20, textAlign:'center'}} onPress={() => navigation.navigate('TvView', {id: item.id, data: item, option:option})}></Button>
              </View>}
          />
      </View>
      </View>
    );
}
After adding the following code in Tv.jsx
Now Come To Main.jsx
Now Add the Following code there.
import {NavigationContainer} from '@react-navigation/native';
import {createNativeStackNavigator} from '@react-navigation/native-stack';
const Stack = createNativeStackNavigator();

function Main() {
  return (

    <NavigationContainer>
    <Stack.Navigator initialRouteName="Channels">
        <Stack.Screen name="Channel" component={TvChannel} />
        <Stack.Screen name="TvView" component={TvView} options=       {{headerShown:false}}/>
    </Stack.Navigator>
  </NavigationContainer>
  );
}


export default Main;
Explanation of code.
Here we are adding Navigation to our App with ReactNavigation package. And creating Main function that defining our Navigations .
Now Come In App.tsx File Import Main Component.
import Main from './components/Main';
function App() {
  return (
      <Main />
  );
}
export default App;
Now with it our App Is ready to run.
So to test it In Your phone (I remember we building it for Tv but no issue first we can easily test in on our phone).
If you have developer option enabled then good else you need to do it.
Remember to USBDebugging On And Default USB configuration to file Transfer.
Connect your to computer with USB .
To Check your is connected properly or not you can run following command. In cmd type adb devices
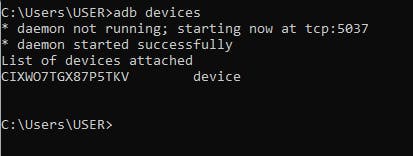
you can see there your device. (If you can't see possibly adb not correctly set up you can join Discord Community to help)
Now Run Following commands.
npx react-native run-android (as we testing it on android).

Now We need to do some changes in our Code to properly run it on our Android Tv
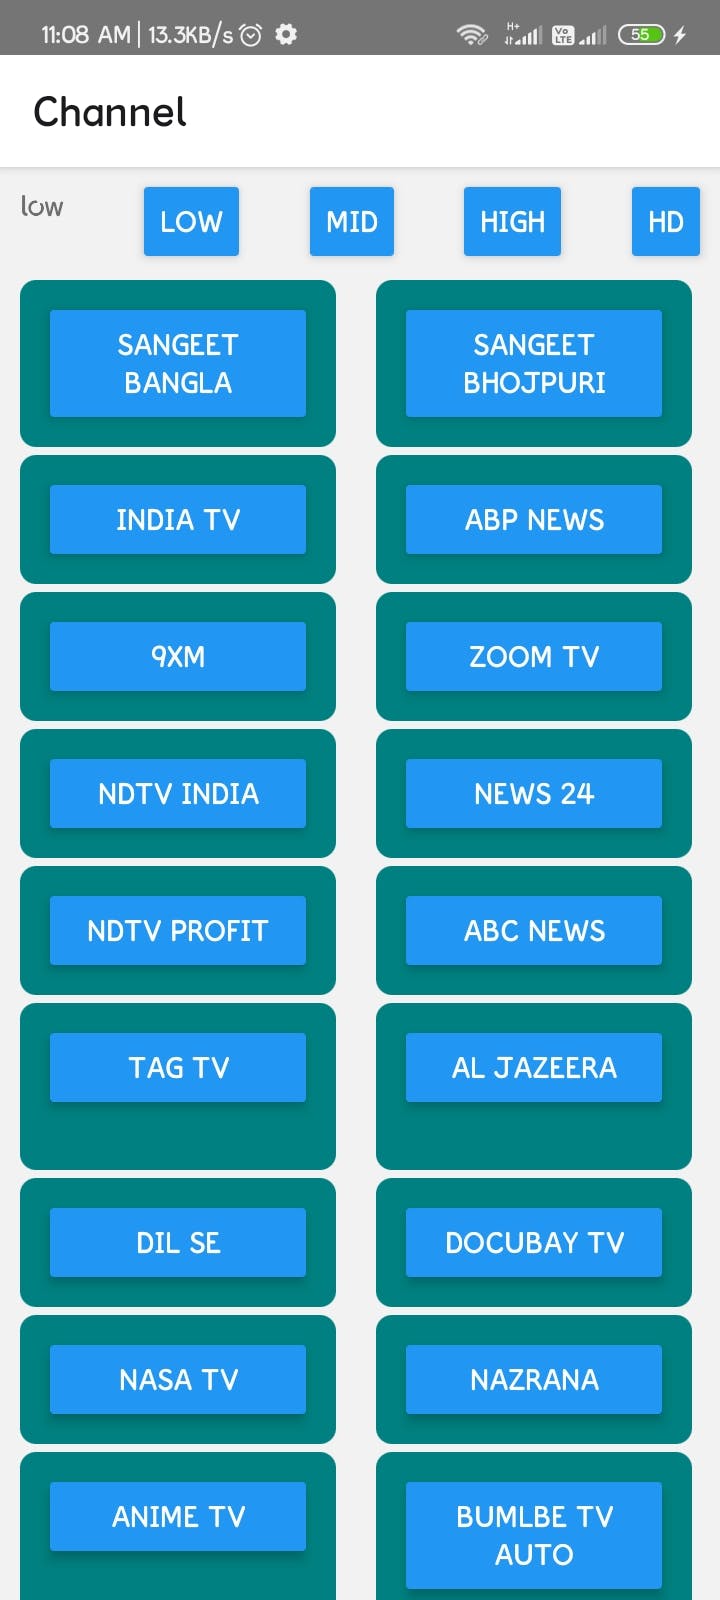
In Tv.js>TvChannel Function Change numColumns to {4}
export const TvChannel=({  navigation })=>{
const [Lists, setLists] =([]);
  const [option, setOption] = useState({
    qua:'low'
  });
useEffect(()=>{
axios.request(options).then(function (response) {
    setLists(response.data);
})
},[])
    return (
      <View>
        <View style={{flexDirection:'row', justifyContent:'space-between',margin:10}}>
          <Text>{option.qua} </Text>
          <Button style={{padding:15}} title={'low'} onPress={()=>{setOption(i=>{return {...i, qua:'low'}})}}></Button>
          <Button style={{padding:15}} title={'mid'} onPress={()=>{setOption(i=>{return {...i, qua:'mid'}})}}></Button>
          <Button style={{padding:15}} title={'high'} onPress={()=>{setOption(i=>{return {...i, qua:'high'}})}}></Button>
          <Button style={{padding:15}} title={'hd'} onPress={()=>{setOption(i=>{return {...i, qua:'hd'}})}}></Button>
        </View>
        <View>
           <FlatList
          horizontal={false}
          numColumns={4} //here//
          data={Lists}
          renderItem={({item}) =>
              <View style={{margin:2,backgroundColor:'teal',borderRadius:8, width:158, marginHorizontal:10,padding:15}} >
                 <Button title={item.name}  style={{padding:20, textAlign:'center'}} onPress={() => navigation.navigate('TvView', {id: item.id, data: item, option:option})}></Button>
              </View>}
          />
      </View>
      </View>
    );
}
And In root>android>app>src>main>AndroidManifest.xml And make the Change There
<manifest xmlns:android="http://schemas.android.com/apk/res/android">

    <uses-permission android:name="android.permission.INTERNET" />

    <application
      android:name=".MainApplication"
      android:label="@string/app_name"
      android:icon="@mipmap/ic_launcher"
      android:roundIcon="@mipmap/ic_launcher_round"
      android:allowBackup="false"
      android:theme="@style/AppTheme">
      <activity
        android:name=".MainActivity"
        android:label="@string/app_name"
        android:configChanges="keyboard|keyboardHidden|orientation|screenLayout|screenSize|smallestScreenSize|uiMode"
        android:launchMode="singleTask"
        android:windowSoftInputMode="adjustResize"
        android:exported="true">
        <intent-filter>
            <action android:name="android.intent.action.MAIN" />
            <!-- <category android:name="android.intent.category.LAUNCHER" /> -->
            <category android:name="android.intent.category.LEANBACK_LAUNCHER"/>
        </intent-filter>
      </activity>
    </application>
</manifest>
Now Connect your tv to with computer wirelessly.
Once you've got that set up, you need to turn on USB Debugging mode on your Android TV.
Enable Developers Option on Tv
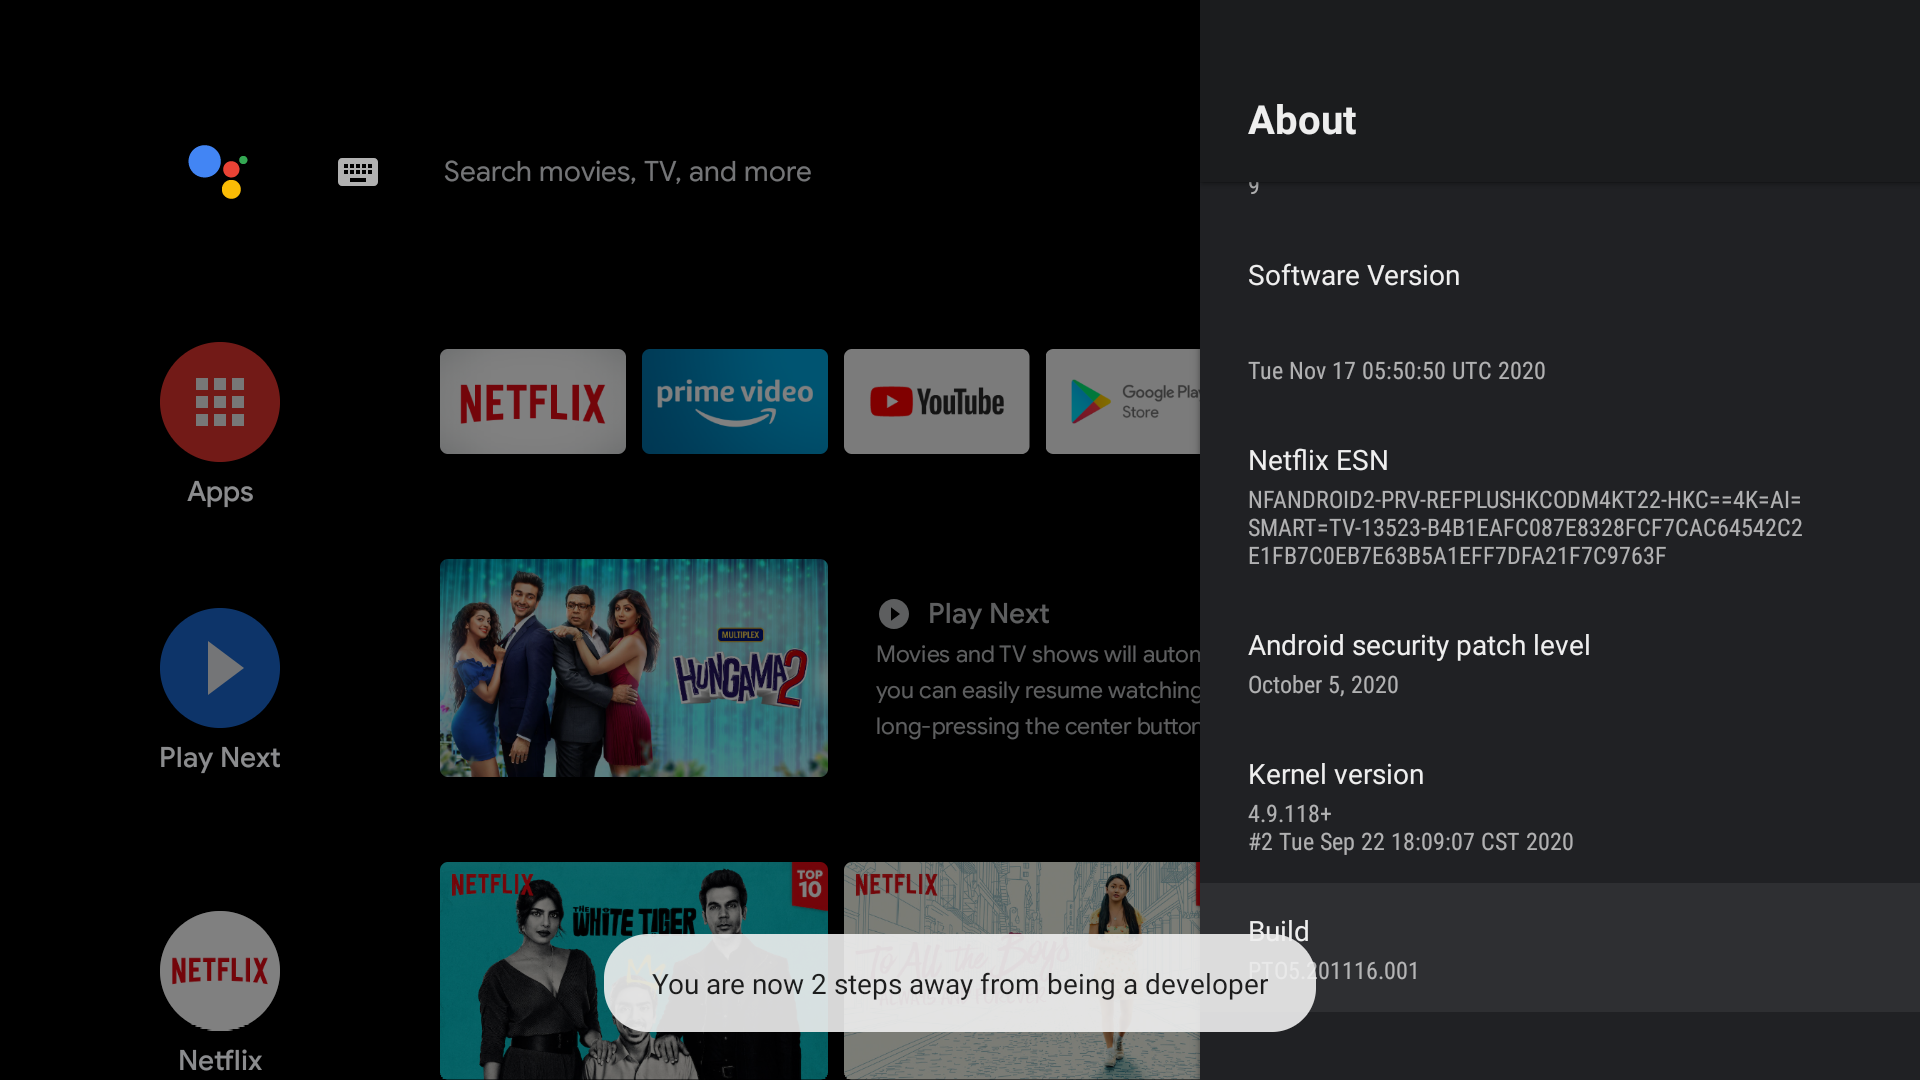
First, go to Settings > Device Preferences > About then tap several times on the Build to unlock the Developer options.
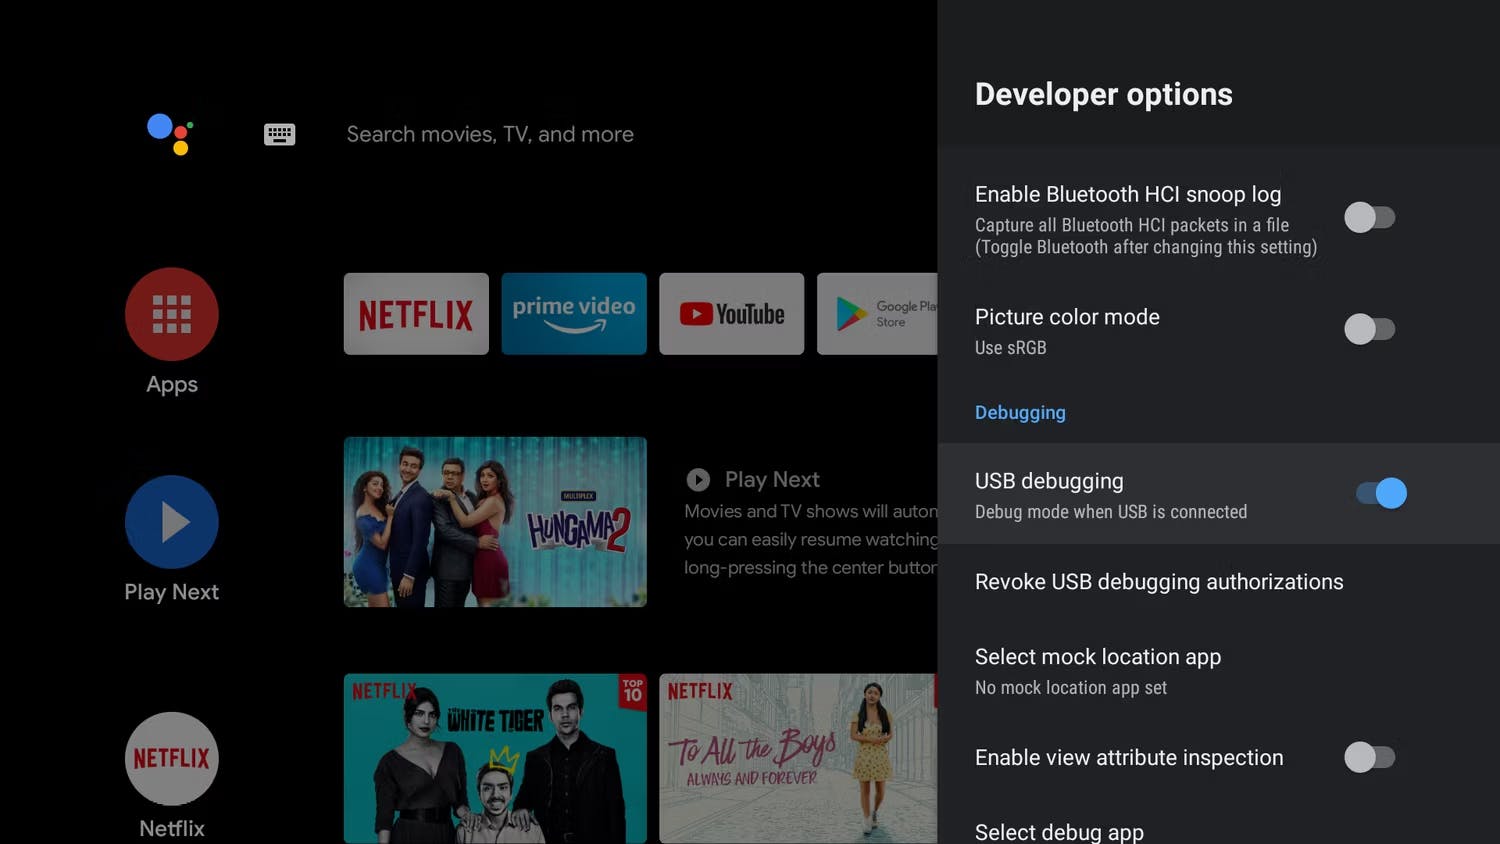
You will now be able to see the unlocked Developer options menu in the Device Preferences. Locate the USB Debugging toggle and enable it.
Connect Android TV to Your PC Using ADB
Normally, we use a USB cable to connect a PC to an Android. Since this is not feasible with Android TVs, manufacturers allow you to set up ADB wirelessly. To do that:
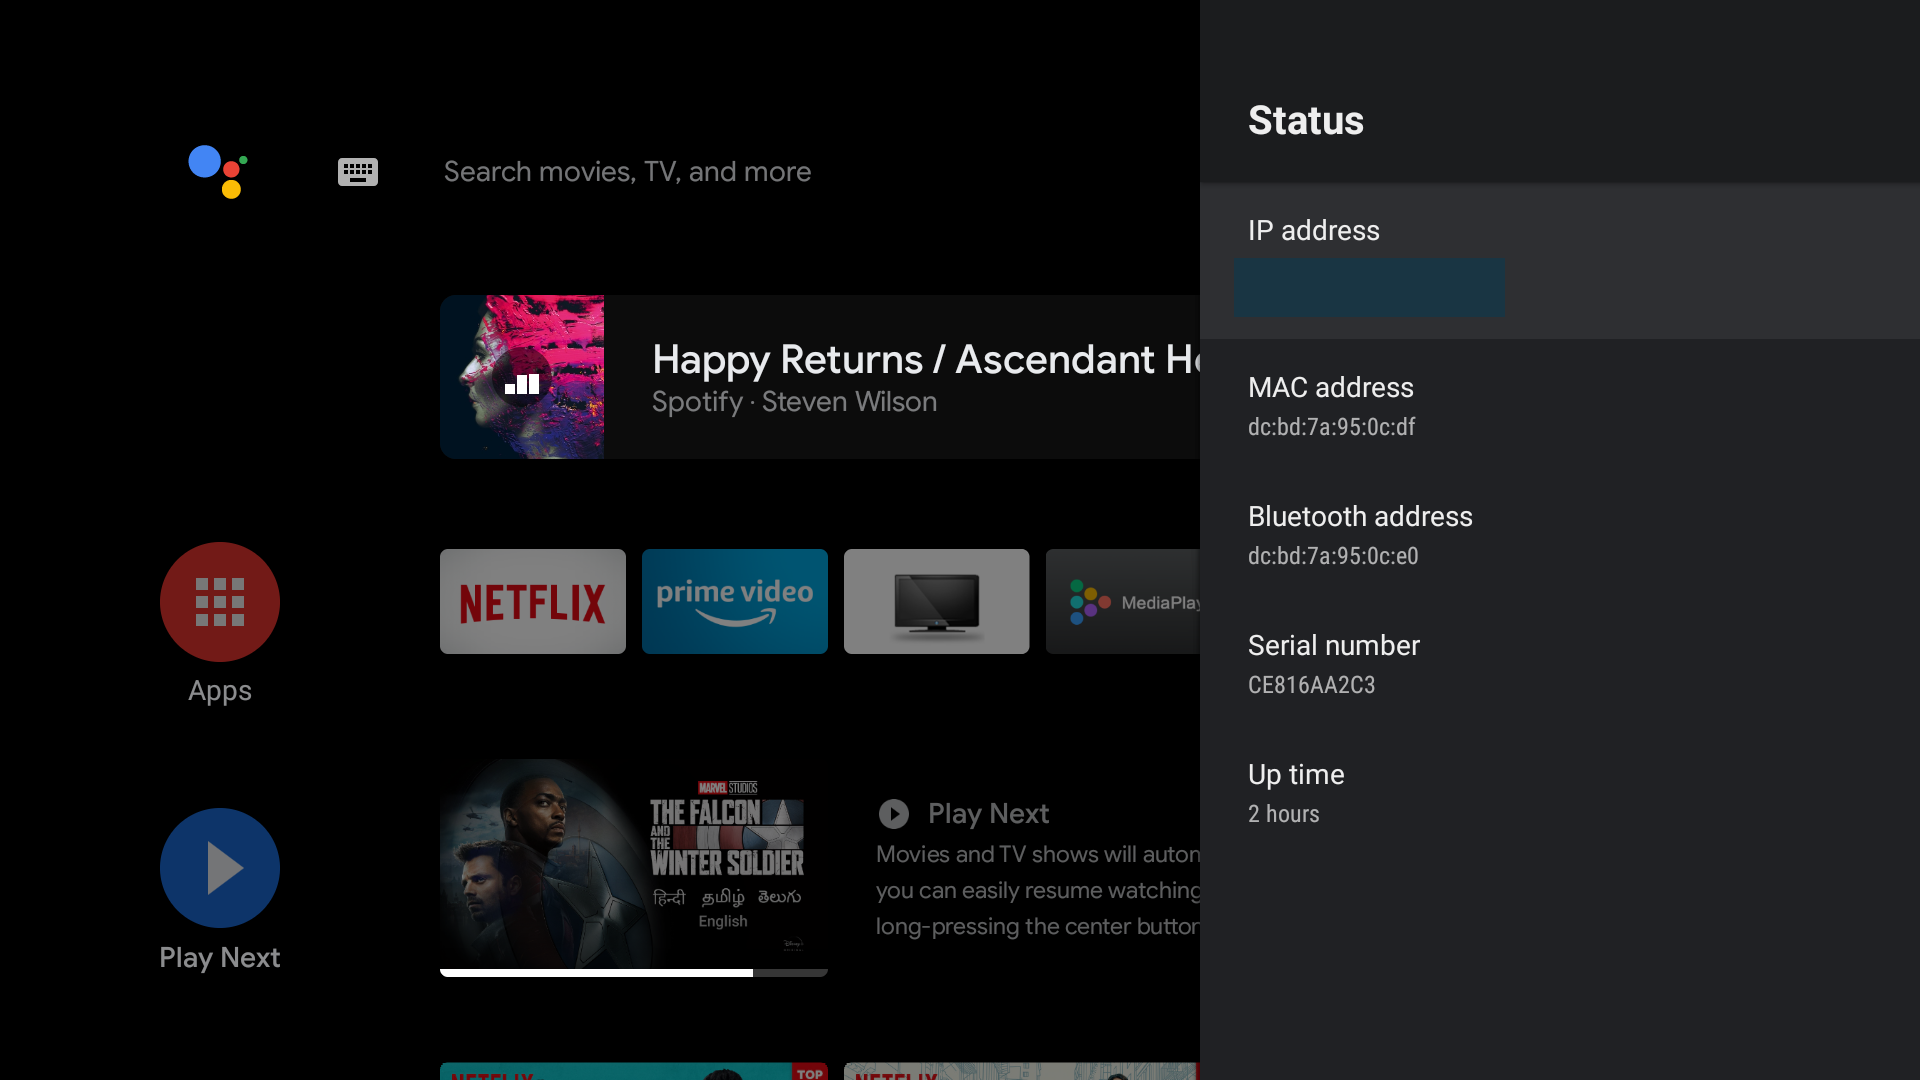
On your Android TV, go to Settings > Device Preferences > About > Status and note down the IP address.
Open the command prompt on your PC and enter the command adb connect <the IP address>.

You will get a prompt on your Android TV asking you to authorize a connection to the computer. Tap on OK.

Now Run the npx react-native run-android it will open it on your Tv. Now Enjoy
Conclusion
This blog not targeted absolute beginners. So you also need to know how to use Google to debug your code.
Join DesiDev's WhatsApp Group to Connect With Other Desidevs Developers.
'You can also Comment if you are facing any issue' so we will help you.